Building extractor-rust: What My Photo Library Taught Me About My Own Shooting Habit (and Rust)

Back in 2016 I wrote a small Java app to parse EXIF data from my photos so I could figure out which focal lengths I actually shoot at. Ten years later, I have a lot more cameras, a lot more lenses, and a photo library sitting at 1-2TB. Time to revisit the problem, this time in Rust.

The tool is called extractor-rust. Same idea as the Java version: crawl a photo library, pull focal length and lens data out of every file, and surface patterns in how I actually shoot. The difference is scale. The old library was a few thousand files from a single trip to Tokyo and Seoul. This one is a decade of shooting across multiple camera systems. I’m about to go to Tokyo and Seoul again soon, and wanted to build something that could analyze if any of my shooting habits changed.

Why Rust

I wanted to learn it. Python would have been faster to write and the EXIF ecosystem there is more mature. But I was curious whether Rust was practical for this kind of utility work, and a file-processing tool felt like a good way to find out. The short answer is yes, with caveats. The borrow checker will find every gap in your mental model and it will not be polite about it. I leaned on Claude Code during the trickier concurrent sections, it’s good at explaining why Rust wants you to do something a certain way rather than just handing you a fix, which made it genuinely useful for learning the language rather than just getting past errors.

Making It Fast

My first version processed files sequentially and at TB scale that’s a real problem: 50,000+ files one at a time adds up. The stack I landed on has three libraries doing most of the work. walkdir handles directory traversal, simple API, memory efficient, handles symlinks and permission errors cleanly without loading the whole tree upfront. kamadak-exif does the EXIF extraction. It’s pure Rust with no C bindings, so it compiles everywhere without native dependencies. Coverage of standard tags is solid, focal length, lens model, camera body, 35mm equivalent all come through cleanly. The rough edges show up with video files and manufacturer MakerNote tags, which are opaque, and you encounter enough malformed EXIF in the wild that error handling ends up more verbose than you’d like.

The interesting one was rayon. It’s a data parallelism library that spreads iterator work across all available CPU cores by swapping .iter() for .par_iter(). That’s basically it – no thread pool configuration, no manual work distribution. Since EXIF extraction is CPU-bound and each file is completely independent, it’s a near-perfect fit. Scan times dropped dramatically. The one caveat is that it doesn’t help if your bottleneck is the disk rather than the CPU, which on slower storage it can be.

What the Data Said

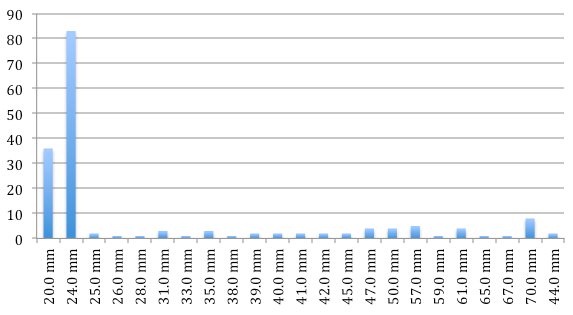
Same conclusion as 2016: I love shooting wide. Running it against the full library, 24mm comes in at 17,516 shots – nearly double 35mm in second place. The grey bars below are phone focal lengths – 7.9mm and 5mm combined add up to over 12,000 shots, which was more than I expected. The long end of my zoom barely registers.

Bar chart showing top focal lengths — 24mm dominates at 17,516 shots, with phone focal lengths shown in grey

The lens data confirms it. The EF 24-70mm f/2.8L II USM accounts for 26,794 shots — more than three times the second place LUMIX 20mm f/1.7. A few lenses I own barely show up at all, which is useful information on its own.

Bar chart showing top lenses — EF 24-70mm f/2.8L II USM leads at 26,794 shots

The camera breakdown was the most interesting output. The Canon EOS 5D Mark III dominates at 36,292 shots, which makes sense, it’s been my primary body for years. But seeing the Sony Cybershot, Sony DSC-P200, and DSC-P10 all in the top five was a reminder of how much history is in this library. Those are early 2000s point-and-shoots. The data goes back further than I was consciously thinking about.

Bar chart showing top cameras — Canon EOS 5D Mark III leads at 36,292 shots, with older Sony point-and-shoots visible in the history

Ten years ago I ran this analysis on a few thousand photos from one trip. Running it on a decade of shooting across every camera I’ve owned tells a more complete story, not just what I’m reaching for now, but where I started and how my shooting has evolved. The old Sony point-and-shoots showing up in the camera list wasn’t just a curiosity, it was a reminder that this library spans a lot of life. The 5D Mark III pulling 36,000 shots tells you everything about which camera actually stuck. And 24mm being that dominant across all of it, that hasn’t changed.

Code is up on GitHub if you want to run it against your own library.

EXIF Parsing Fun

I’m thinking about replacing my Olympus OM-D E-M5 as a travel camera. The Olympus is great and has served me quite well on my trips, but I’d love to get something with faster autofocus and with better low light performance. Current frontrunners in no particular order include the Leica Q, Sony RX1R II, Fuji X100T, and Sony A7S II. Since these are mostly fixed lens cameras, the most obvious differences in deciding between these cameras for me is the focal length, with the exception of the A7 of course. All of this got me thinking – at what focal length do I most like taking most of my photos? The Leica Q is 28mm, and the RX1 and X100 are 35mm, so I should probably figure that out.

I decided to quickly tackle something that I’ve wanted to do for a while but never got the chance: write a quick Image Reader App that can extract EXIF data from photographs and do a simple unique count of the focal lengths.

I did some searching to see if there were any existing libraries that did some EXIF parsing and decided on this one, by a smart guy named Drew Noakes. Even better, it included support for both of my cameras which are a Canon 5D Mark III with 24-70 f/2.8 II and of course my Olympus with the Lumix 20mm f/1.7. It looks like it only supported Java so I threw together a really terrible app that took a directory path and iterated through each photo and did a count. As my sampling, I decided to point it at a directory of some of my favorite photos from a trip to Tokyo and Seoul from a few years ago. The results were quite shocking:

{44.0 mm=2, 65.0 mm=1, 41.0 mm=2, 26.0 mm=1, 47.0 mm=4, 40.0 mm=2, 24.0 mm=83, 45.0 mm=2, 61.0 mm=4, 35.0 mm=3, 50.0 mm=4, 38.0 mm=1, 42.0 mm=2, 67.0 mm=1, 59.0 mm=1, 70.0 mm=8, 39.0 mm=2, 31.0 mm=3, 25.0 mm=2, 28.0 mm=1, 33.0 mm=1, 20.0 mm=36, 57.0 mm=5}

Quickly plotted this on a graph:

What this chart tells me is that I love shooting wide angle. According to the stats I’ll zoom in a few times but only rarely. So which camera should I get?


Leica Q it is.

For those of you who want to see my code (the single java class in all its glory), I’ve pushed it to a new repository called “Extractor” on my GitHub page.

Wireless Networking with Raspberry Pi

The Raspberry Pi is great and I really enjoy it, but I couldn’t help to think that it would greatly benefit from wireless capabilities. I can only assume for cost reasons they didn’t ship it with onboard wireless networking (the newly announced Raspberry Pi 2 does not have wireless either).

This morning I received the Edimax EW-7811Un Wi-fi USB Adapter in the mail that I ordered a few days ago. (Thanks Amazon for the free Sunday delivery!) A little bit about this USB Adapter – it’s a super tiny thumb-sized USB-based Wifi adapter that is capable of connecting to b/g/n networks that doesn’t require external power. It also runs the Realtek RTL8188CUS chipset which is widely supported by many Raspberry Pi distros, including Raspbian 2014-09-09, the OS that I am running.

Adding the Edimax Nano Wireless USB Adapter doesn't add too much bulk.

Adding the Edimax Nano Wireless USB Adapter doesn’t add too much bulk.

Side shot with the USB adapter installed.

Side shot with the USB adapter installed.

Setup is easy.

Plug in the USB adapter into an available USB port on the Pi, and power on the Pi. You will need a keyboard at the very least, or if you’re running in headless mode, you will need it to be plugged into a network cable so you can SSH remotely into it.

Edit the network interfaces file like so in your editor of choice (emacs, obviously, being the best choice):

You’ll see some configuration in here by default, you’ll want to replace it with the configuration below. You’ll want to type your Wireless SSID and Password in for where I’ve put placeholders (you will want to retain the double quotes):

At this point you will want to restart networking, you can do so by issuing the following command:

From here, running ifconfig will list all of the active network interfaces – if you see a valid IP next to wlan0 then we’re in business; you can disconnect your ethernet cable and congratulations, you’ve cut one more cord from the awesomeness that is the Pi!

As a side note, as normally, ethernet will continue to work as a separate interface. i.e. Raspbian will assign through DHCP an IP to eth0, as well as an IP to wlan0 if both a Wireless connection and Ethernet connection is made. This is redundant so it’s discouraged, but useful in case you are having trouble with wireless and need to fall back onto Ethernet to do some troubleshooting.

Raspberry Pi + HDMI CEC + Node.js

I’m a huge fan of Google’s Chromecast. I’m an even bigger fan of the little-known HDMI CEC protocol originally introduced with HDMI 1.0, which is a spec that allows devices to control CEC-enabled devices through HDMI. This is the technology used by Google that allows Chromecast to turn a TV on from a standby state and automatically switch to the appropriate input when you cast a video stream to the device from a remote client. While this has been a great feature which I frequently use with my Samsung HDTV (Samsung refers to HDMI CEC as “AnyNet+”), it’s unfortunate that there was no option to turn off the TV from a remote client.

After doing some additional research I quickly learned that HDMI CEC is rather capable with what it allows a client device to do and that it does so much more than just turning on or off a device – OSD Display, Device Menu Control, Routing Control, System Information, Timers, Status, to name a few.  I was ecstatic!

After digging even deeper I learned that my Raspberry Pi Model B fully supports HDMI CEC, and the fine folks at Pulse-Eight have developed a fairly mature C++ based library to control rudimentary CEC functions. While this was a great option, it required me to maintain an SSH connection into my Raspberry Pi which was less than ideal (I’m so lazy that I can’t reach for the remote control, what makes you think I’ll SSH in to issue a command line to my Raspberry Pi to turn off my TV?).

rpi

The palm-sized Raspberry Pi Model B computer!

I decided to wrap the lib-cec C++ library in a quick and dirty Node.JS Express Framework app so that I could remotely send commands from my phone over a web server. The core piece of my app is contained here, which enables the “on”, “off” and “status” functions of the CEC protocol, and pipes the output to the web client for the user to see:

The app routes are invoked when the user accesses the URL path for “on”, “off”, or “status”. I modified my Firewall’s Iptables to port forward the app so I can even check on my TV from outside my network, and it works like a charm! I can now control my TV from my iPhone, which means…

achievement_laziness

Full code can be seen in  my GitHub project page found here. Feel free to help me clean it up 🙂
https://github.com/dan-nguyen/hdmi-cec-node-test/